Showing posts with label Desserts / Sweets / Cookies. Show all posts

Lemon Crinkle Cookies

Lemon Crinkle Cookies

Have you ever seen the first rays of the sun stream through the dark clouds after a heavy downpour? Have you ever caught the moment a crying child's face suddenly lights up with a smile? Have you felt the soothing warmth of the first sip of tea after rushing indoors from the bitter cold? Nothing compares to experiencing these heartwarming moments first-hand, but these Lemon Crinkle Cookies are a pretty good & ready-at-hand proxy - their sweet & tangy essence & radiant looks are sure to remind you of life's bright moments. Imbued with the tanginess of freshly squeezed lemon juice, covered with powdered sugar, chewy & tender on the inside and slighty crunchy on the outside, the Lemon Crinkle Cookies are oozing with scrumptious & zesty deliciousness. The first bite of these cookies will make your heart skip a pleasureable beat as you savor the pleasure of the light & airy cookie crumbling in your mouth to release a torrent of sweet & tangy flavors.

In these winter days, as the temperature drops and the days get shorter, these Lemon Crinkle Cookies add a little reminder of the warm & sunny summer to the holiday season cheer. In addition, preparing these cookies requires little effort - they are surprisingly quick and easy-to-make. So go ahead & bake a batch of them, & if anyone complains why you didn't make the chocolate cookies (they won't after they have tasted one of these), tell them "That's the way the cookie crinkles" :)

LEMON  CRINKLE  COOKIES  RECIPE


Makes 15-18 pcs.

Ingredients:
3/4 cup All-Purpose Flour
1/4 cup Unsalted Butter, softened
1 egg; at room temperature
1/3 cup granulated Sugar
1/4 tsp Pure Lemon Extract or Pure Vanilla Extract
2 tsp Lemon Zest
1 tbsp fresh Lemon Juice
1/8 tsp Salt
1/8 tsp Baking Powder
1/16 tsp Baking Soda
1/4 cup Powdered Sugar/Confectioner's Sugar; sifted

How to make Lemon Crinkle Cookies

  1. Preheat the oven to 350 F. Line 2 baking sheets with parchment paper. Set aside.
  2. Combine flour, baking powder, baking soda and salt in a bowl. Set aside.
  3. Using a stand mixer/hand mixer, cream the butter and granulated sugar together until light and fluffy (takes about 3-4 minutes). Add the egg & mix until smooth.
  4. Add the lemon zest, lemon juice and vanilla extract, and mix again until smooth. Scrape the sides of the bowl & mix again.
  5. With the mixer on low speed, gradually add the flour mixture, mixing until it is just incorporated. Scrape sides of bowl and mix again briefly.
  6. Add the confectioners' sugar to a wide, shallow bowl. Scoop about a tablespoon of cookie dough & drop it in the confectioners' sugar and roll in the sugar until well-coated. Once coated, roll between your palms to form a ball. Transfer to the prepared baking sheets. Repeat process to form more balls, and place them about 2 inches apart on baking sheets. 
  7. Bake for 10 minutes, or until the cookies have puffed and their surfaces have cracked. They'll still be fairly light in color. Remove from oven and cool cookies for about 3 minutes before transferring to cooling rack.
  8. Store in an airtight container at room temperature.
Read more ...

Double Chocolate Banana Muffins

Double Chocolate Banana Muffins

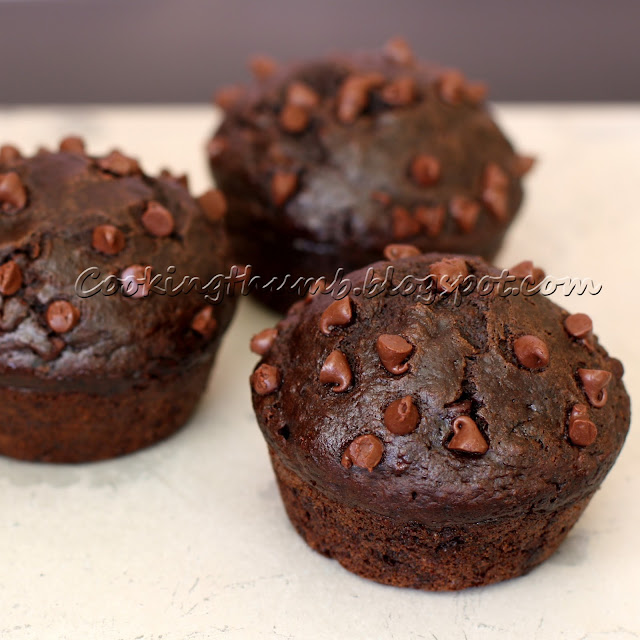
Double Chocolate Banana Muffins - yummmmm! Does this double the deliciousness, you say? No!!! I reply - emphatically shaking my head at this shocking simplification. This is chocolate, not a mathematical formula. Double the quantity means incalculably, infinitely, immeasurably more scrumptiousness, more lusciousness, more oomphness, more funnnn! Yayyy, you say, your taste buds enlightened. Me, I'm silent - hard to speak with a mouthful of muffin! Soaked in chocolatey goodness, this Double Chocolate Banana Muffin is the epitome of indulgence. Just a single bite into the moist, succulent cake texture gratifies the senses with a rush of bitter-sweet, ambrosial chocolate flavors and the fruity-sweet twist of the banana. And it is a delectable sight to behold too - with the little chocolate chips stuck on the muffin top like dark stars on an inky-black night!

It all started when the banana on my kitchen counter stared at me with its yellow, angry eyes. Why don't you like me - I am shrivelling here for days, it implored. I don't know, I stuttered. Maybe because you aren't covered in chocolate or as moist & decadent as a cake or muffin, I ventured helpfully. Sadly, my lame reply just made the banana curl up in anger even more. Well, no reason you can't eat me with a cake or chocolate, retorted the banana. Of course, I slapped my forehead (a little too hard, ouch!) as I rushed to the infinite wisdom of the internet. Unfold your "banana chocolate muffin" secrets, o great one, I begged Google & was rewarded with 7,580,000 results before I could say "please". So I adapted this recipe from Tasteofhome, but created a healthier version by replacing oil with apple sauce & reducing the sugar to a half-cup. I was right! It turned out to be the perfect level of decadence & sweetness (feel free to use 3/4 cup if you prefer more sugar). Taking a large bite of this Double Chocolate Banana Muffin, I turned my eyes skywards & thanked the powers above for this manna from heaven. A deep, serene, silent voice boomed in my head - Don't mention it, it was muffin'!

DOUBLE  CHOCOLATE  BANANA  MUFFINS  RECIPE

Makes : 11-12 Muffins

Ingredients:
1 1/2 cups All-Purpose Flour (Maida)
1/2 cup Sugar; see tips
1/4 cup + 2 tbsp Dutch-process Cocoa Powder
1 tsp Baking Soda
1/2 tsp Salt
1/4 tsp Baking Powder
1 1/3 cup mashed ripe Bananas
1/3 cup Unsweetened Applesauce; see tips
1 Egg
1 tsp Pure Vanilla Extract
1 cup Mini semi-sweet chocolate chips + 2 tbsp for sprinkling on top of the muffins

How to make Double Chocolate Banana Muffins

  1. Preheat oven to 350 degrees F. Line a 12-cup muffin tin with paper liners or grease it with cooking spray & set aside. 
  2. In a large bowl, sift the first 6 ingredients together & stir to mix. 
  3. In a separate medium bowl, whisk together the egg, applesauce, vanilla extract & mashed bananas until very well combined. 
  4. Stir wet ingredients into dry until just moistened. Fold in 1 cup chocolate chips. 
  5. Divide the batter between prepared muffin cups & sprinkle about 1/2 teaspoon chocolate chips on each muffin. 
  6. Bake for 20-25 minutes, or until toothpick comes out clean when inserted in the center of the muffin. 
  7. Cool for 5 minutes in the muffin tin then remove to a cooling rack. Store in an airtight container.
TIPS

I used Applesauce as a healthier substitute for vegetable oil. If you wish, you may use 1/3 cup vegetable oil instead of Applesauce.

We do not prefer overly sweet Muffins so 1/2 cup sugar was perfect in terms of sweetness for us but if you prefer more sweetness then increase the sugar to 3/4 cup.    
    Read more ...

    Raspberry Champagne Float

    Raspberry Champagne Float
    Champagne and raspberries stir up in my heart & mind the most beautiful things in life - romance, love, weddings, celebrations... so it was only natural that I thought of conjuring up a recipe that would bring together these wonderful creations of nature. Even so, I must admit that I was a tad skeptical on whether the combination would live up to my high expectations. But oh my, what a sublime dessert beverage this Raspberry Champagne Float has turned out to be! So exquisite & heavenly with luscious flavors of vanilla ice cream, tangy jelly and fresh berries soaked in the sweet-sour bubbliness of champagne. The simple trick of creating layers of ingredients and serving in champagne flutes gives a sophisticated, chic appearance to the dessert beverage & sets it a class apart. You can enjoy this dreamy concoction to celebrate special occasions with family & friends. My personal favorite would be to serve it as the final course of a candle-lit dinner for two - it is sure to raise the romance to a new high!

    Making Raspberry Champagne Float is a moment's work once you have the ingredients at hand. The dessert beverage is amazingly simple and quick to make, and you can increase/decrease the quantity of ingredients to suit your taste. Needless to say, this is not a recipe for kids due to the alcohol content, but you can make it kid-friendly by replacing the champagne with a fizzy lemonade.

    Time to pop the cork & relish life's sweet pleasures :)

    RASPBERRY  CHAMPAGNE  FLOAT  RECIPE

    Makes : 4 glasses

    Ingredients:
    1 cup fresh Raspberries
    5.8 oz Vanilla Ice cream
    1 packet Raspberry Jelly (3oz); see tips
    1/2 bottle of Dry Champagne

    How to make Raspberry Champagne Float

    1. Prepare Jelly as per package instructions. However, instead of using the amount of water specified on the packet, use 1/3 cup of water and 2/3 cup of Champagne. Refrigerate gelatin mixture for about 15 minutes or until thickened but not set. Break up the partially set gelatine with a fork.
    2. In each glass, spoon about 2 tbsps of gelatine, then top it with around 2 tbsps of ice cream then top it with a layer of raspberries. Repeat the layers one more time. Chill till serving time.
    3. Top each glass with Champagne just before serving. Serve immediately.
    TIPS
    Vegetarian Jelly is available in Indian Grocery Stores.
    Read more ...

    Blueberry Cream Cheese Wreath

    Blueberry Cream Cheese Wreath

    Disclaimer: Unlike most festive wreaths that are hung on doors as decoration, this Blueberry Cream Cheese Wreath is a yummilicious, ambrosial dessert that is perfect for parties, holidays & celebrations (though why someone would want to wait for a special occasions to dig into its sweet, succulent goodness is beyond me!). But if you still choose to, you can try hanging it on your door - do let me know how that turns out ;) Also, you will be forgiven for mistaking this Blueberry Cream Cheese Wreath as a gateway to foodie heaven, it is the undisputed destination with every bite.

    "Don't play with your food" must be the most oft-repeated dinner table command issued by moms all over the globe to their frisky kids - God knows that I have heard my share of "don'ts" in my childhood days. But its funny how the same quote takes an entirely different meaning in the confines of one's kitchen. I LOVE to play with my food there, & discover new yummilicious recipes ... oh yes, I sure do! :) So when I discovered some cream cheese & fresh blueberries (oh summer, I love you & the plethora of fruits & berries you bring) pining away in my fridge, I knew that I just had to turn it into a delectable dessert that would overflow with nectarous wholesomeness & overwhelm its eater with its divine, luscious, lip-smacking oomph. So, voila! World, I hereby present to you the magnificent Blueberry Cream Cheese Wreath to be relished by posterity till eternity. The succulent berries release their juices as you bite into the dish, blending their zesty tanginess with the sweet, velvety butteriness of the cream cheese to create a sweet-tangy tango that will wow your senses & your guests. Did I tell you it's so quick & easy-to-make....ssssssh don't anyone it's a secret ;) Ready to take a heavenly bite? :)

    BLUEBERRY CREAM CHEESE WREATH


    Makes : 8 Pcs 

    Ingredients:
    1 can Crescent Rolls
    1/3 cup Cream Cheese
    1/3 cup granulated sugar or to taste; see tip 1
    1 1/2 tsp Vanilla Extract
    1 1/4 cup fresh Blueberries
    Fresh Blueberries for decorating, optional
    1 tbsp Powdered Sugar / Confectioner's sugar for dusting, optional

    How to make Blueberry Cream Cheese Wreath

    1. Preheat oven to 375 degrees F.
    2. Combine cream cheese, sugar & vanilla extract in a bowl.
    3. Unroll the crescent rolls & separate them into 8 triangles as per the marked perforations.
    4. On a round baking pan, arrange the triangles in a wreath shape with shortest side of the triangle towards the center & overlapping each other & about 2 inches of pointed end of each triangle hanging over the baking pan. After arranging the triangles in a wreath shape, remember you will be left with an empty circle of about 2-3 inches in the center of the baking pan.
    5. Spread the cream cheese mixture on to the crescent rolls (non-hanging part). Spread the blueberries on top of the cream cheese.
    6. Pull the pointed ends of each triangle over the filling & tuck under the dough.
    7. Bake in the oven for 15-16 minutes or until golden brown. Allow it to cool.
    8. Just before serving, arrange blueberries around the rim of the baking pan & in the center of the wreath. Sprinkle confectioner's sugar over the blueberries. Serve.

    TIPS:
    1. Adjust the sugar quantity as per the tartness of your blueberries and/or as per your taste.
    2. Last step is optional. Feel free to arrange any way you wish. You may apply vanilla glaze over the crescents or just sprinkle confectioner's sugar over them.

    Read more ...

    Molten Chocolate Lava Cake

    Molten Chocolate Lava Cake

    Molten Chocolate Lava Cake - yummmmm! Even the name of this delicious dessert oozes of sweet, ambrosial, warm chocolate-filled decadence. The enticing dark-brown outer cake layer hides a treasure of hot, gooey chocolate filling that oozes out as a river of molten chocolate as you break the cake. This delectable chocolate temptation is combined with ice-cream/whipped cream along with strawberries/raspberries and served as an exquisite dessert in high-end restaurants. And rightfully so, for it is a gourmet's delight - one bite of this delectable dessert is sure to infuse warm, sweet mellowness that will spread through your senses & transport you straight to chocolate heaven!

    Best served hot straight from the oven, these delicious cakes are quick to make, and once you know the correct preparation style you will see that they are not so hard to bake at home. Fortunately for you, I have done the hard work of figuring out the right preparation style through multiple attempts :) I perfected my composition after trying out multiple recipes on the great internet, and finding all of them lacking in one thing or other - no molten chocolate flowing out, crust too hard, too eggy, incomplete recipes,  the list goes on...

    You will feel like a proud master baker once you have delivered this culinary pièce de résistance to the dining table - and make sure to practice your bow and your "oh-it-was-nothing" words as you receive the tons of accolades that are sure to come your way from your amazed & grateful family & friends. After all, who can resist the temptation of intense bitter-sweet chocolate flavors blending with warm, moist cake? Why would anyone even want to resist? So go ahead and try it out, and bring your chocolate fantasies to life :)

    MOLTEN  CHOCOLATE  LAVA  CAKE  RECIPE


    Serves : 4

    Ingredients:
    1 stick  (4 oz) unsalted Butter
    2 tbsp All purpose Flour (Maida)
    6 ounces Bitter-sweet Baking Chocolate (see tip #2)
    2 Eggs
    2 Egg yolks
    1/3 cup Sugar
    1 tsp Pure Vanilla extract
    A pinch of Salt
    2 tbsp powdered Sugar / Confectioners sugar for dusting

    How to make Molten Chocolate Lava Cake

    1. Preheat oven to 400 degrees F. Generously butter & lightly flour four 5.5-ounce ramekins or custard cups. 
    2. Place butter & baking chocolate into a large microwave-safe bowl & microwave for 1 minute. Stir until butter and chocolate are smooth.
    3. In a medium bowl, beat the eggs, egg yolks, sugar, vanilla extract and salt until thick, pale & fluffy.
    4. With a wire whisk gently fold the egg mixture into the chocolate mixture, just until incorporated. Sift the flour into the chocolate mixture then stir until just combined. Do not over-mix or the batter will deflate.
    5. Spoon the batter equally into the prepared ramekins & place them on a baking sheet. Bake at 400 degrees F for 11-12 minutes or until the sides are set but center is still soft (not jiggly)
    6. Let the cakes cool for 2 minutes, then place an inverted plate on top of each ramekin. Carefully turn it over & unmold the cakes gently onto the serving plates. Sprinkle the top of each cake with confectioners sugar.  Serve immediately along with a dollop of vanilla ice cream / whipped cream & berries.

    Tips:
    1. You can prepare the chocolate mixture a couple of hours in advance of serving. Place the prepared mixture into ramekins, cover ramekins with plastic wrap, and refrigerate. Bake just before serving - the refrigerated batter may take an extra minute or two to bake.
    2. If you do not like the taste of Bitter-sweet Chocolate, you may substitute it with Semi-sweet Chocolate.

    Read more ...

    Eggless Checkerboard Cookies

    Eggless Checkerboard Cookies

    Checkerboard Cookies are the Cadillac of cookies - classic in looks & taste & holding a universal charm that refuses to fade with time. Comprising of contrasting colors and a confluence of delightfully dissimilar cocoa & vanilla flavors, this crumbly cookie holds a special place in my heart. It was my first hesitant attempt at baking as a kid (I was in 8th grade), and surprisingly they turned out so well that I still vividly recall the loving praises that my mom & sis showered on me. Love you both! :)

    This recipe is especially great for people who do not eat eggs. Despite its intricate looks, these cookies require simple ingredients and are really easy to prepare. Checkerboard cookies are perfect for making in bulk & storing to serve at tea-time, or to gift during the holidays. You could even make a chessboard out of these cookies, & the winner gets to eat the board, Lol - kids would love this game :)

    Checkerboard Cookie Recipe

    Makes : 25 Cookies

    Ingredients:
    1 3/4 cup All Purpose Flour (Maida)
    1/2 cup Powdered Sugar, or to taste (see Tip # 3)
    3/4 tsp Vanilla Essence
    1/8 tsp Lemon extract
    2 tsp Dutch-Process Cocoa Powder
    110 g Unsalted Butter; softened
    1/8 tsp Salt
    Water for brushing

    How to make Checkerboard Cookies

    1. In a large bowl, sieve flour, sugar & salt together. Add butter & knead lightly to form a smooth dough (see Tip # 2). 
    2. Divide the dough into 2 equal parts. In one part, add vanilla essence & lemon extract & knead till the essence/extract is fully incorporated. In the other part, sprinkle cocoa powder over the dough & knead till the dough is evenly colored.
    3. Split each part of the dough again into two to get 2 equal cocoa parts and 2 vanilla parts.
    4. Roll each part into a cylindrical shape. With your fingers, form each part into a rectangular shape (8" long x 1 1/2" thickness).
    5. Cover work surface with plastic wrap & place a vanilla roll on it. Place a cocoa roll next to the vanilla roll. Brush a little water on the adjoining sides of the vanilla & cocoa roll. Now join them gently. Brush a little water on the top of these rolls, and place the second set of rolls such that the cocoa roll is on top of the vanilla roll & vice versa. Make sure to brush a little water on the adjoining sides of the second set of rolls too. Press all the rolls lightly together so that the entire dough is joined.
    6. Wrap the assembled log in plastic. Refrigerate for 2 hours, or until firm.
    7. Preheat oven to 350 degrees F. Line a baking sheet with parchment paper. With a sharp knife cut the refrigerated dough into 1/4" thick slices. Place slices about 1" apart on baking sheet.  Bake for  8-10 minutes or until cookies start to brown around the edges.
    8. Remove baking sheet from oven & let cookies cool for 3 minutes. Transfer cookies to a wire rack to cool completely.
    9. Store cookies in an airtight container.
    Tips:
    1. Baked cookies can be stored in an airtight container up to one week.
    2. If the dough is too crumbly add a little milk as required to form a smooth dough.
    3. These cookies are not very sweet. If you prefer more sweetness, add more sugar as per your taste.

    Read more ...

    Strawberry Coconut Laddoo (Rolls)

    Strawberry Coconut Laddoo

    Strawberry Coconut Laddoo is my fruity version of the delectable Coconut Laddoo - sweet, soft, spherical delicacy made of coconut. Coconut Laddoo is a massively popular "Mithai" (Indian sweet) in North India, available all year round in sweet shops and a huge favorite during Indian festivals. One of the easiest and quickest Indian sweets to make, this fuzzy and delicious delight is a must-try at home for anyone planning to make a party dessert or looking to satisfy their sweet cravings.

    Always a rebel at heart, I just had to add my spin to this popular sweet. So I added strawberry to the Coconut Laddoo, and voila! The result amazed me (though I did suspect that I was on to a good thing) - as the soft Ladoo melted in the mouth it released the tangy flavors of strawberry, that swirled in the sweet coconut and amplified its deliciousness. And I just had to keep it all as low-calorie as possible to satisfy my health-nut hubby, so I replaced the more fatty versions of the recipe that use either ghee (clarified butter) or condensed milk, with regular milk (2% fat). Having hubby polish off one laddoo after another was ample proof that my recipe worked - both in taste and in calorie-count. Thanks to hubby, I have no Laddoos left, but I can certainly offer you the recipe... try for yourself :)

    Strawberry Coconut Laddoo Recipe


    Makes : 18-20 Pieces

    Ingredients:
    2 cups Dessicated Coconut; grated
    1/2 Litre Milk (2% Milkfat)
    3/4 cup Fresh Strawberry purée
    1/4 cup + 1 tbsp Sugar, or to taste
    1/3 cup Dessicated Coconut; powdered
    Water in a small bowl

    How to make Strawberry Coconut Laddu (Rolls)

    1. Boil milk in a thick-bottomed deep pan.
    2. Add  sugar and grated dessicated coconut. Cook on medium heat, while stirring constantly.
    3. Once the mixture becomes thick, lower the heat. Add strawberry puree, cook till the mixture starts separating from the sides of the pan or till the mixture becomes dry & of binding consistency. 
    4. Remove from the heat & let the mixture cool down to room temperature. 
    5. Divide the mixture into equal portions. 
    6. Apply little water on your palms & roll each portion between your palms into medium-size balls/laddoos. 
    7. Roll each ball/laddoo into the powdered dessicated coconut such that it gets completely covered.
    8. Refrigerate till serving time.


    Read more ...

    Sooji Malai Halwa

    Sooji Malai Halwa

    Sooji Malai Halwa is a luxuriant, creamy twist to the traditional Sooji Halwa - one of the most popular Indian desserts. Sooji Malai Halwa is a unique preparation that I learnt from my mom - the creamy texture and flavor transform the traditional Sooji Halwa into a amazingly delectable dessert and turns it into an ambrosial concoction fit for the gods.

    Halwa (Halva) is a flour-based dessert with gelatinous consistency, and Sooji (or Suji or Rava) is the Indian word for Semolina. Sooji Malai Halwa is amazingly easy to prepare, and the sweet aroma that rises as the Halwa simmers in the pan is sure to tempt your family & guests to dip a spoon straight into the Wok to have a go at the golden Malai Halwa. So next time you have a sweet craving, indulge yourself with Sooji Malai Halwa - your sweet tooth will thank you forever :)

    Sooji Malai Halwa Recipe

    Serves : 4-5

    Ingredients:
      1 cup Semolina Flour (also called Sooji or Rava)
      1 cup Cream
      2 tsp melted Clarified Butter (Ghee)
      3/4 cup Sugar or to taste
      3 cups Water
      1 tsp Cardamom powder
      8-10 Raisins
      1 tbsp Pistachio slivers for garnishing

        How to make Sooji Malai Halwa

        1. Mix semolina flour & cream in a bowl. Set aside for half an hour.
        2. In the meantime, boil water, sugar and cardamom powder in a pot on medium heat. Keep stirring often till the sugar dissolves. Switch off the heat & set aside.
        3. Heat a deep non-stick pan on medium heat. Add semolina-cream mixture & roast till it turns golden brown while stirring constantly.
        4. Once roasted, lower the heat, gently add the sugar syrup while stirring constantly to prevent lumps from forming. Be careful while adding syrup as the mixture will splatter.
        5. If there are any lumps, break them with the back of your spatula/stirring spoon to get a smooth consistency. Add raisins & mix well.
        6. Increase the heat to medium, cook the mixture till it is thick.
        7. Add clarified butter & mix well. Cook till the mixture starts separating from the sides of the pan.
        8. Sooji Malai Halwa is now ready. Transfer it to a bowl & garnish with Pistachio slivers.
        9. Serve hot.
        Read more ...

        Strawberry Phirni (Strawberry Rice Pudding)

        Strawberry Rice Pudding, Phirni

        I distinctly remember the first time I had Phirni (Rice Pudding), a delectable and popular Indian dessert, as a kid. It was in a garden party on a beautiful summer night, with the soft white light of the full moon bathing everything in ethereal luminosity. The pudding tasted as delicious & exquisite as a heavenly nectar, like somebody had extracted white, sweet, creamy & cool moondrops. On instinct, I closed my eyes to savor the smooth blissfulness of this luscious delicacy, as it caressed my taste buds with its luxuriant texture & ambrosial sweetness. Ever since then, this rice pudding is my dessert of choice whenever I want a trip to the moon without stepping out of my home :)

        However, being the incorrigible tinkerer, I just had to make my own variant of the traditional Phirni. Ergo, I added strawberries to provide a zesty fruity twist that complements the subtle sweetness of the creamy rice pudding - & going by the rave reviews I receive every time I serve this dessert to my family & guests, I guess I did the right thing :) A spoonful of this sweet concoction is sure to bring a smile to your lips, & an entire bowl of the Strawberry Rice Pudding will set your spirits flying high - don't forget to fasten your seat belts :)

        STRAWBERRY  RICE  PUDDING  (PHIRNI)  RECIPE

        Serves : 3-4

        Ingredients:
          16 fresh Strawberries
          4 tbsp Rice
          1 qt (946 ml) Whole Milk
          6 tbsp White granulated Sugar, or to taste
          1 tsp Rose Extract
            For garnishing:
            4 fresh Strawberries; washed, hulled & sliced
            8-10 Pistachio slivers; optional

            How to make Strawberry Phirni

            1. Wash the rice thoroughly till the water runs clear. Soak the rice in 1 cup of water for half an hour. Strain the rice and grind it to a coarse paste along with 2 tbsp of milk.
            2. Chop half of the strawberries. Keep aside. 
            3. Grind the remaining strawberries to a fine paste. Keep aside.
            4. Boil milk in a deep heavy-bottomed pan. Add ground rice to the boiling milk and mix well.
            5. Reduce the heat and let the mixture simmer, stirring at intervals (& scrap the sides of the pan as well) until the milk thickens to a creamy consistency.
            6. Add sugar & rose extract and stir till sugar dissolves. Adjust sugar to your taste.
            7. Remove from heat. Allow it to cool to room temperature. Add chopped strawberries & puree. Refrigerate.
            8. Serve strawberry phirni chilled and garnish with pistachios and sliced strawberries. 
            TIPS:

            Do not reheat after adding strawberries as the milk may curdle.

                Read more ...

                Matar Ki Kheer

                Matar Kheer recipe


                Kheer - Rice-based pudding, one of India's most popular desserts. Also called Khiri, Payasam, Payesh depending on the region in India.
                Matar - Green Peas
                Matar Kheer - Green Peas pudding (Green Peas replace the rice)

                Oh, what a cruel world we live in. By nature's heartless joke, healthy food and tasty food are like East & West - never meeting, always competing. It is indeed a punishment that mankind is fated to keep trying to somehow make a delicious dish with healthy ingredients - or vice versa. Faced with this paradox, only a few masterful recipes come close to bridging this eternal divide.

                Matar Kheer is one of them. The juxtaposition of these terms (healthy Matar alongside calorie-rich Kheer) itself is so ludicrous, that people dismiss this dessert as a non-starter even before tasting the ambrosial outcome. It is by no means a replacement for a health bar, but if you are looking for a trip to dessert heaven on a lean ticket, this protein-rich (due to the Peas) delicacy is one of your better bets. 

                Matar Kheer has only one big problem. How do you convince all those skeptics and food snobs who believe that a dessert needs to be deep-fried, sugar-drowned, butter-drenched before it tastes sinfully good, and turn up their noses at the mere mention of healthy peas in a dessert dish? This has happened so often that I now present it as Pistachio Kheer ;) - the green hue and Pistachio shavings used as garnishing lend themselves well to the camouflage. The ruse has worked well, and I let the person in on the secret when he or she comes back for a second helping (everyone does!). The look of disbelief on the person's face is priceless, you should keep your camera handy. So remember - Ssshhh, its a secret... well, at least till the second helping :)

                MATAR KHEER RECIPE


                SERVES : 4

                INGREDIENTS:
                1 cup Green peas (fresh or frozen); shelled
                1 tbsp Clarified butter (Ghee)
                1 1/4 liters Whole Milk
                1/4 cup White granulated Sugar, or to taste
                1 tsp Green Cardamom powder
                15-20 Raisins (Kismis); optional
                25 Pistachios; sliced

                For Garnishing:
                  8 Pistachios; sliced
                       

                    How to make Matar Ki Kheer / Mutter Ki Kheer

                      1. Wash & boil the green peas in microwave for 5 minutes or till tender. Refresh in cold water & grind to a fine paste.
                      2. Heat clarified butter in a thick-bottomed pan on medium heat. Add green peas paste & saute for 3-4 minutes while stirring constantly. Remove from heat & keep aside.
                      3. Boil the milk in another deep pan. Add the milk to the cooked green peas paste. Mix well. 
                      4. Place the thick-bottomed pan containing the milk-peas mix on low heat.
                      5. Let the mixture simmer for 15-20 minutes or till the milk is thickened. Keep stirring intermittently.
                      6. Add sugar, green cardamom powder, raisins & pistachios. Simmer for another 5 minutes while stirring continuously. Adjust sugar as per your taste.
                      7. Turn off the heat and allow it to cool down.  Refrigerate it.
                      8. Serve chilled, garnished with Pistachios.


                          Read more ...